Free Photoshop resources. Textures, Actions, Backgrounds, Brushes and Totally Free Stock Photography.

Showing posts with label tutorials. Show all posts
Tuesday, July 15, 2014

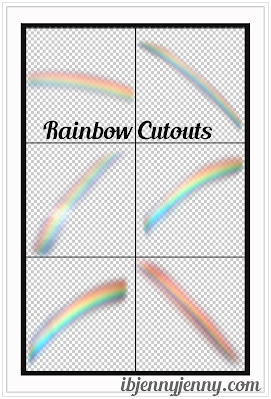
Free Rainbow PSD Cutouts plus Tutorial on How to Use Them.


Ok, so I love Rainbows, there it's out. LOL
Well I do. But the real kind. I am not all girly, girly fake Rainbows all over my room, I like the real ones because they are beautiful.
So I decided to make you some Rainbows (made from REAL Rainbows) that you can add to your photographs or backgrounds or where ever you wish.

They are in PSD Format and were created in CS6.

While I was at it I figured I would do a little tutorial for those who do not know how to use them. The Tutorial is included in the download also.

My Rainbow Cutouts are Free to Download and use in your Personal or Commercial projects. No need to credit me unless you offer them as a download on a website, in that case please link back to my website. Thanks

Enjoy.
Be Creative.


169px x 249px

Download button


First open the image you want to add your Rainbow to.


rainbow tutorial 1


Next, go to File and then to place and select a Rainbow from where ever you put them on your computer. :)


rainbow tutorial2

Once the Rainbow is added to your image, just adjust the size and placement by dragging the edges Just double click the image to place it there.


rainbow tutorial3

After it is in place you may want to adjust the opacity of it  like I have as you can see below.


rainbow tutorial5

And that's it! 


rainbow tutorial6

Sunday, March 9, 2014

Free Coloring/Texture PSD plus Tutorial

Hey, Hey, Hey,

Sorry I have been away but we had kittens! Yeah! And so cute. A Cat I rescued had them the day after we rescued her. For more on the kittens check out the Facebook Page I made for them, you will be happy you did.

Ok now for my post.
Here is something different. It's a Texture PSD but made as a Coloring PSD. I created them in CS6 and all you have to do is follow the Tutorial below to see how to use them. I created the tutorial rather quickly so if you have any Questions feel free to Contact Me and I will help you.

This is a FREE Download.
Personal and Commercial use are ok


And here is how you use them....


That's it, hope you like it.
Enjoy. Be Creative.
Sunday, February 9, 2014

FREE Valentine's Day Photoshop Patterns Plus a Tutorial On How To UseThem

Hello....the weekend is over and that is so so sad. LOL
But I have something to cheer you up and me too.
Photoshop Patterns for Valentine's Day. yep, yep.
I have even made you a little Tutorial below on how to use them if you don't know how, hopefully it's easy enough to follow but I don't usually do Tutorials so don't be too surprised if it's not easy to follow. LOL
Let me know if you need more help.

My Valentine's Day Patterns were created in CS6.
Their sizes vary but they are all High Quality Seamless Patterns.
20 Patterns in this set.

This is a Free Download
Personal and Commercial Use are OK

710x1084

446x133


Need help using these? Read on....

Ok well the first thing you have to do is unzip the Valentine's Day Patterns to your computer.
Next, you will need to find an image or a texture to use them with.
I have plenty of Textures you could use if you need one. :)
For this Tutorial I will use one from my Renaissance Tunblr Backgrounds.
Open your image/texture you will be using in Photoshop.

Now lets load the patterns you have unzipped to your computer
1197x825 load-pattern

  • Click edit 
  • Click Presets
  • Click Presets Manager
You should now see the screen below
1197x766 load pattern 2

  • Click Arrow
  • Click Patterns
  • Click Load
Now let's Add the Patterns you have loaded to your image/texture

1197x867 add pattern

  • Click Layer
  • Click New Layer
  • Click Pattern


Next you should see the box below

1197x719 add pattern 2
  • Just Click Ok

Then you will see this Box
1197x768 add-pattern 3

  • Choose your pattern
  • Adjust Your Size
  • Click ok
I knew you could do it! :)
Now lets adjust the pattern, If you want to of course/

1197x597  adjust layer

You can adjust the opacity and change the layer type by clicking the circled arrows you see above.

And that's it, you have added your Pattern.

Oh and don't forget to flatten your image when you are done

1197x862 flaten image


  • Click Layer
  • Click Flatten Image
I hope this helps.